In photography, it is very important to know about metering, as well as the role of each metering mode. That’s because it helps you control your photo’s exposure – or, in layman’s terms, your photo’s brightness. When I got my first DSLR—a Nikon D80—one of my frustrations was that some images would come out too bright or too dark. I had no idea how to fix it, until one day, when I learned about camera metering modes. Today I’m going to share with you what I know about metering in photography, and how you can use it to take better photos.
Table of Contents
What is Metering?
Metering is how your camera evaluates the light of a scene to determine the correct shutter speed, aperture, or ISO. Back in the old days of photography, cameras were not equipped with a light “meter”, which is a sensor that measures the amount and intensity of light. Photographers had to use hand-held light meters to determine the optimal exposure. Obviously, because the work was shot on film, they could not preview or see the results immediately, which is why they religiously relied on those light meters.
Today, every digital camera has an integrated light meter that automatically measures the reflected light and determines the optimal exposure. The most common metering modes in digital cameras today are:
- Matrix Metering (Nikon), also known as Evaluative Metering (Canon)
- Center-weighted Metering
- Spot Metering
- Highlight-weighted Metering

Some cameras offer more variations on this theme, such as Canon EOS models that have “Partial Metering”, which is similar to Spot Metering, except the covered area is larger (approximately 8% of the viewfinder area near the center vs 3.5% in Spot Metering). Other cameras with subject-recognition modes like Sony cameras often have finely-tuned subject-weighted metering, which calculates the metering based on the subject.
You can see the camera meter in action when you shoot in Manual Mode – look inside the viewfinder and you will see bars going left or right, with a zero in the middle, as illustrated below.

If you point your camera at a very bright area, the bars will go to “+” side, indicating that there is too much light for the current exposure settings. If you point your camera at a very dark area, the bars will go to the “-” side, indicating that there is not enough light. You would then need to increase or decrease your shutter speed to get to “0”, which is the optimal exposure, according to your camera meter.
A camera meter is not only useful for just the Manual Mode – when you choose another mode such as Aperture Priority, Shutter Priority or Program Mode, the camera automatically adjusts the settings based on what it reads from the meter.
Matrix / Evaluative Metering
Matrix Metering or Evaluative Metering mode is the default metering mode on most digital cameras. It works by dividing the entire frame into multiple “zones”, which are then all analyzed on an individual basis for light and dark tones. More advanced Matrix/Evaluative metering systems may try to figure out the scene in front of you using machine learning algorithms and adjust the exposure accordingly.

One of the key factors (in addition to color, distance, subjects, highlights, etc) that affects matrix metering, is where the camera focus point is set to. After reading information from all individual zones, the metering system looks at where you focused within the frame and marks it as more important than all other zones.
You should use this mode for most of your photography since it will generally do a pretty good job of determining the correct exposure. I leave my camera metering mode on matrix metering for most of my photography needs, including landscape and portrait photography.

Center-Weighted Metering
Using the whole frame for determining the correct exposure is not always desirable. What if you are trying to take a headshot of a person with the sun behind? This is where center-weighted metering comes in handy. Center-weighted Metering evaluates the light in the middle of the frame and its surroundings and ignores the corners. Compared to Matrix Metering, Center-weighted Metering does not look at the focus point you select and only evaluates the middle area of the image.

Use this mode when you want the camera to prioritize the middle of the frame, which works great for close-up portraits and relatively large subjects that are in the middle of the frame. For example, if you were taking a headshot of a person with the sun behind him/her, then this mode would expose the face of the person correctly, even though everything else would probably get heavily overexposed.

Spot Metering
Spot Metering only evaluates the light around your focus point and ignores everything else. It evaluates a single zone/cell and calculates exposure based on that single area, nothing else. I use this mode a lot for my bird photography, because the birds mostly occupy a small area of the frame and I need to make sure that I expose them properly, whether the background is bright or dark.
Because the light is evaluated where I place my focus point, I could get an accurate exposure on the bird even when the bird is in the corner of the frame. Also, if you were taking a picture of a person with the sun behind but they occupied a small part of the frame, it is best to use the spot metering mode instead. When your subjects do not take much of the space, using Matrix or Center-weighted metering modes would most likely result in a silhouette, if the subject was back-lit. Spot metering works great for back-lit subjects like that.

Another good example of using spot metering is when photographing the Moon. Because the moon would take up a small portion of the frame and the sky is completely dark around it, it is best to use Spot metering – that way, we are only looking at the light level coming from the moon and nothing else.
In short, spot metering is good when you want the brightness of your specific subject to be a “middle” value. It may result in flawed exposures when you are photographing, say, a bride in a white dress or a groom in a black tuxedo, because it will try to make the white/black subject gray in both cases.

Highlight Priority
Many cameras also have a highlight priority metering mode, which has an indicator icon similar to that of spot metering but with a star beside it.
Highlight priority metering aggressively protects the highlights in your shots. This can be very useful if you have some brighter areas near your subject that you don’t want to overexpose.
On the other hand, highlight priority can be too aggressive in certain scenes as well. If there are bright but unimportant scenes of your shot, or parts you will later crop out, then highlight priority will certainly underexpose the important parts of your composition.

How to Change Camera Metering Mode
Most cameras can change metering modes either through a dedicated button or through the photo shooting menu. On Nikon Z cameras, it can be found in the shooting menu. On Canon R cameras, it involves pressing the “Q” button and selecting the metering icon on screen. Even if your camera does not have a dedicated metering button, you can often assign metering to a custom button.
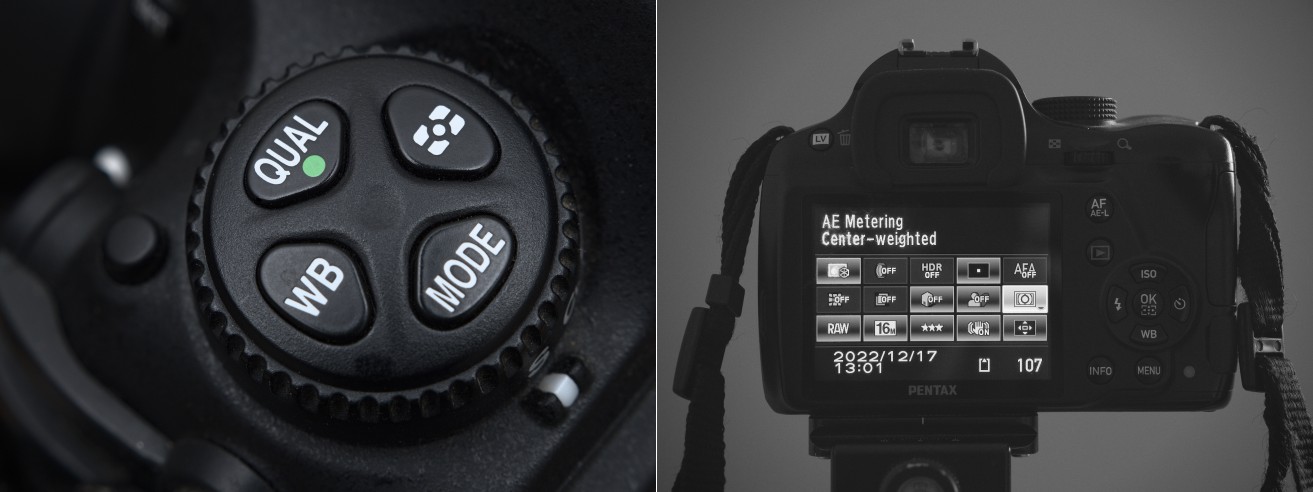
Unfortunately, this varies not only from manufacturer to manufacturer but also from model to model. On the Nikon D5500, for example, it is done through the Info button. On the Nikon D5, there is a separate button on the top left dial whereas on the Z9 it is in the photo shooting menu, but it can be assigned to a button also.
How to Override Metering
Camera meters work great when the scene is lit evenly. However, it gets problematic and challenging for light meters to determine the exposure when there are objects with different light levels and intensities. For example, if you are taking a picture of the blue sky with no clouds or sun in the frame, the image will be correctly exposed, because there is just one light level to deal with. The job gets a little harder if you add a few clouds into the image – the meter now needs to evaluate the brightness of the clouds versus the brightness of the sky and try to determine the optimal exposure. As a result, the camera meter might get confused.
In short, selecting the right metering mode allows you to quickly get close to the exposure you’re after. Nonetheless, you might find that the metering is not quite right, especially after reviewing your shots, or after looking at the in-camera histogram or zebras.
In this case, all cameras have a function called exposure compensation. Accessing it is typically a matter of pressing a button that looks like a ± sign or turning a dial. Many cameras in aperture or shutter priority mode allow you to directly change the exposure compensation by directly turning a dial.
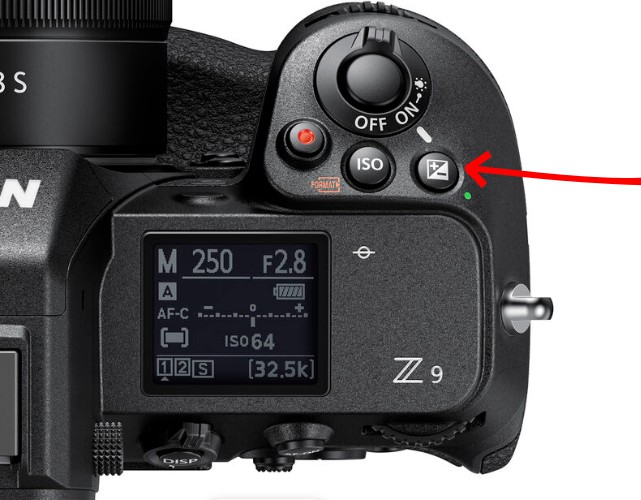
Thus, if the metering is overexposing too much for your taste, you can turn the exposure compensation down. Likewise, if the scene appears too dark, you can turn it up. In other words, you should think of the metering mode as a good starting point, and the exposure compensation as the fine-tuning to get closer to the result that you want.
Good
Bore
Thanks
Again, Thank you very much 🙏👍
Helpfull!!
was so useful since am a beginner
Excellent article and well said. Thank you.
Just checked out a couple of the chapters and this is very good. I’m going to recommend it to some former students for “review”!
This is the best Photography site I ever visited.
Excellent resource and so clearly explained. This is my one-stop-shop for basic photo info